Pyobjus on iOS#
You may be wondering how to run pyobjus on iOS devices? The solution to this problem is to use kivy-ios.
As you can see, kivy-ios contains scripts for building kivy, pyobjus and other libraries needed for running your app. It also provides scripts for making xcode projects from which you can run your python/kivy/pyobjus applications. Sounds great, and it is.
Example with Kivy UI#
Let’s first build kivy-ios. Execute following command:
git clone https://github.com/kivy/kivy-ios.git
cd kivy-ios
./toolchain.py build kivy pyobjus
This can take some time.
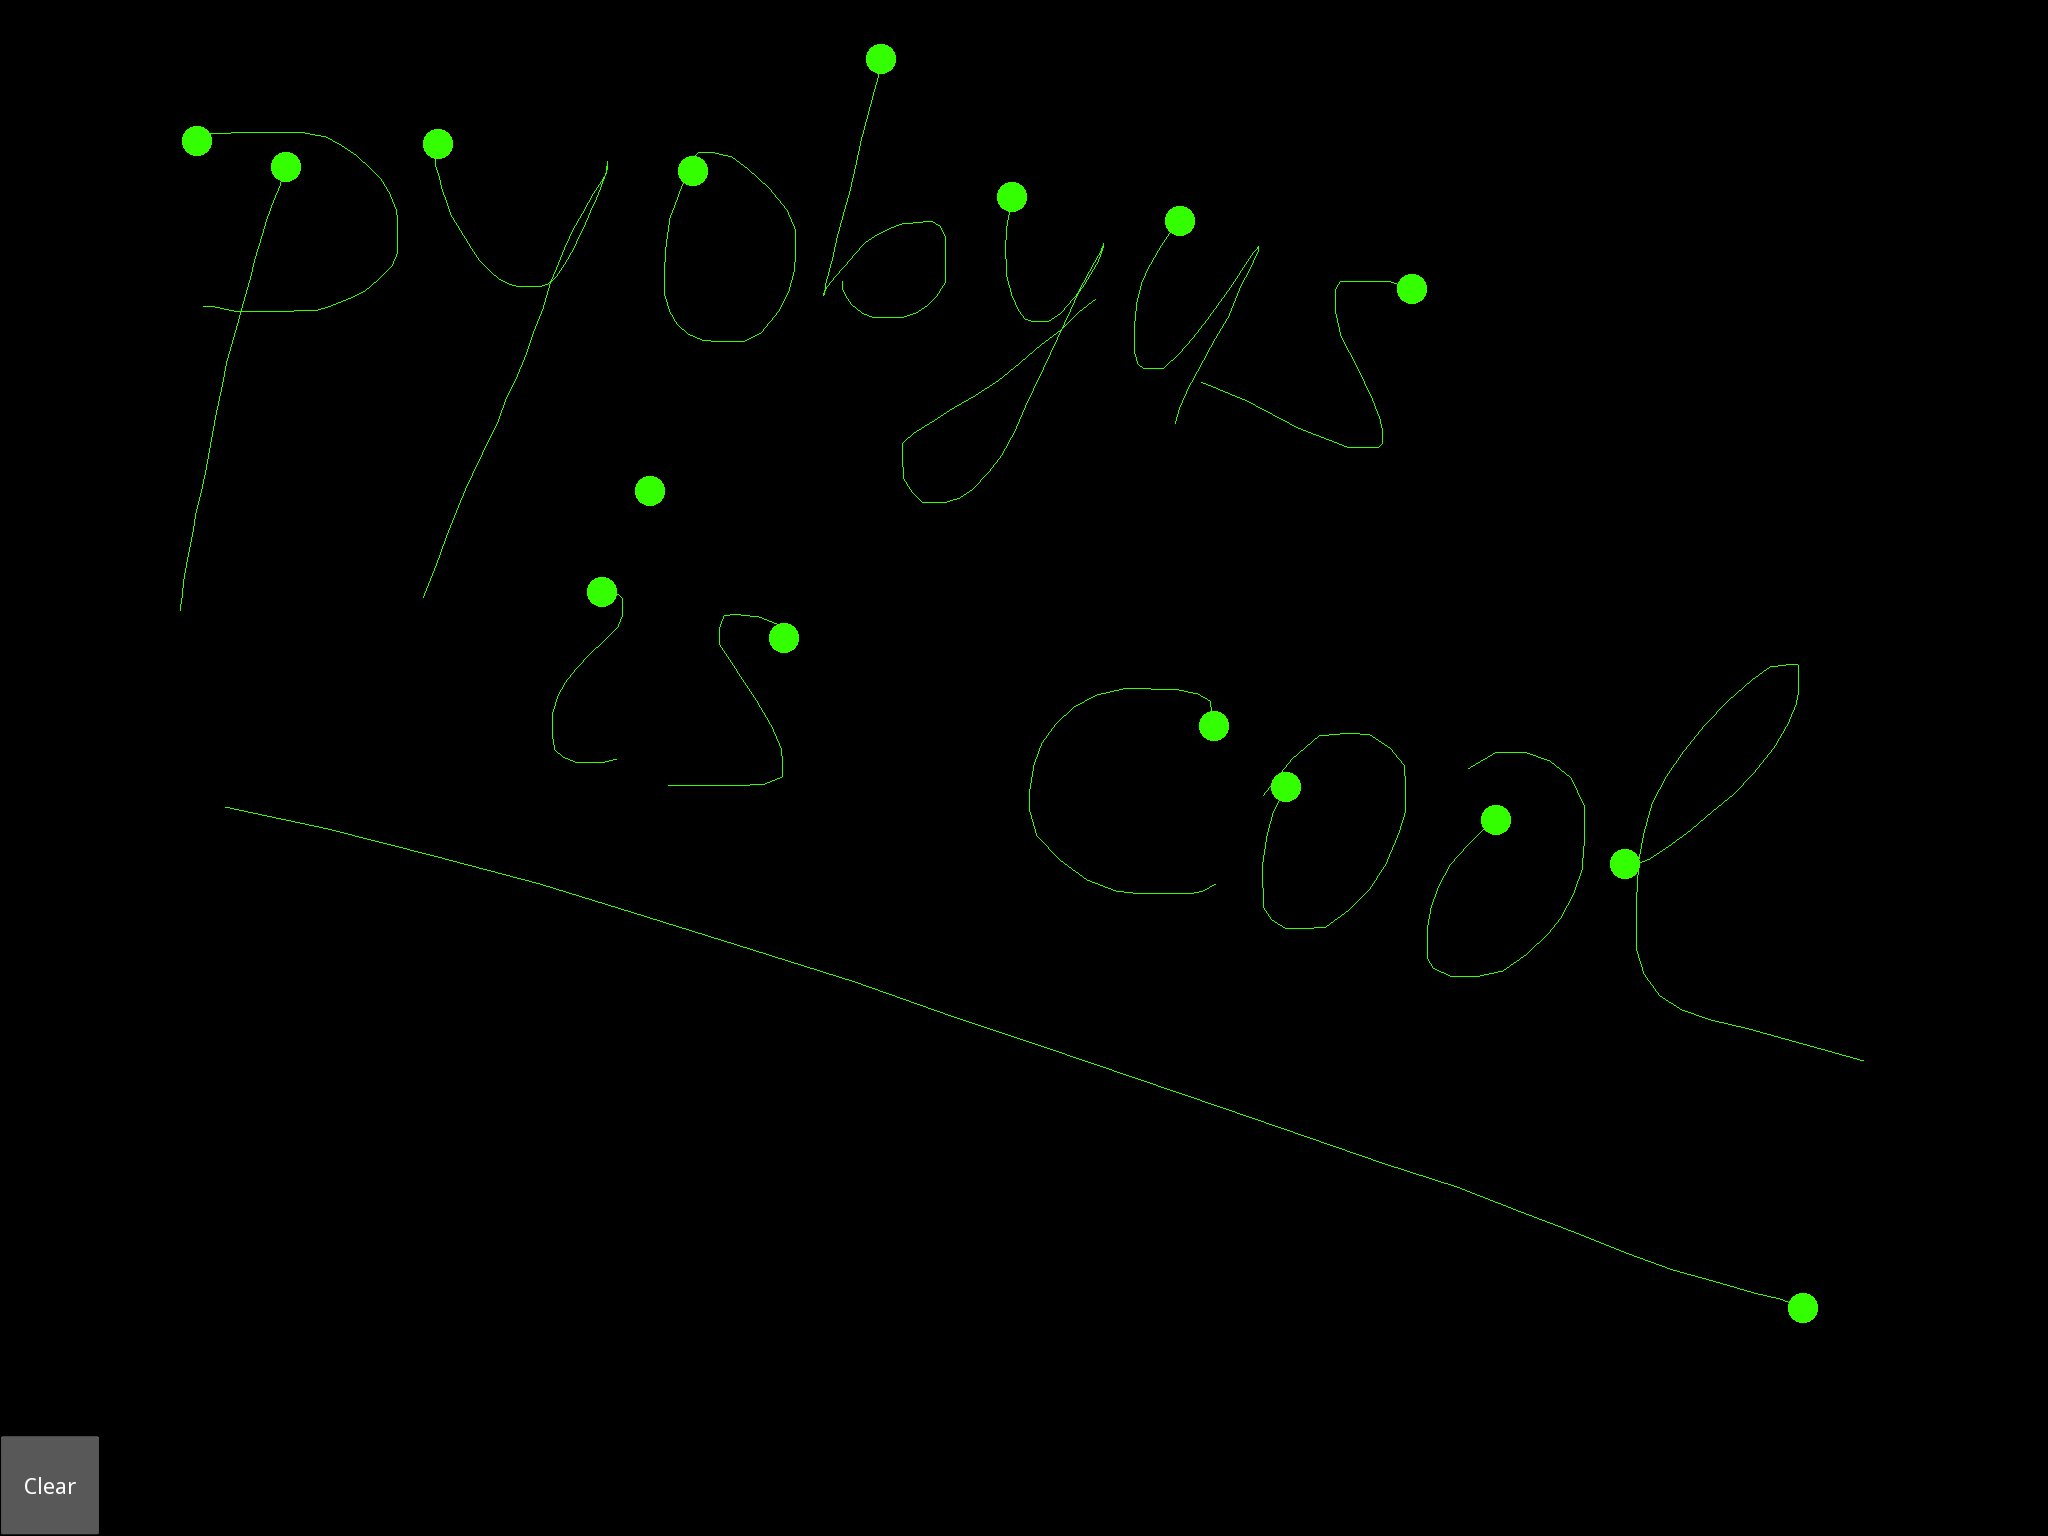
You can build your UI with the kivy framework, and access device hardware using pyobjus. So, let’s look at one simple example of this. Notice that a tutorial describing how to use kivy-ios exists as part of the official kivy-ios documentation, but here we will provide another one, with focus on pyobjus.
Let’s first make one simple example of using pyobjus with kivy.:
from pyobjus import autoclass, objc_f, objc_str
from kivy.app import App
from kivy.uix.widget import Widget
from kivy.uix.button import Button
from kivy.uix.label import Label
from kivy.graphics import Color, Ellipse, Line

NSArray = autoclass('NSArray')
array = NSArray.arrayWithObjects_(objc_f(0.3), objc_f(1), objc_f(1), None)

class MyPaintWidget(Widget):

    def on_touch_down(self, touch):
        color = (array.objectAtIndex_(0).floatValue(), array.objectAtIndex_(1).floatValue(), array.objectAtIndex_(2).floatValue())
        with self.canvas:
            Color(*color, mode='hsv')
            d = 30.
            Ellipse(pos=(touch.x - d / 2, touch.y - d / 2), size=(d, d))
            touch.ud['line'] = Line(points=(touch.x, touch.y))

    def on_touch_move(self, touch):
        touch.ud['line'].points += [touch.x, touch.y]


class MyPaintApp(App):

    def build(self):
        parent = Widget()
        painter = MyPaintWidget()
        btn_text = objc_str('Clear')
        clearbtn = Button(text=btn_text.UTF8String())
        parent.add_widget(painter)
        parent.add_widget(clearbtn)

        def clear_canvas(obj):
            painter.canvas.clear()
        clearbtn.bind(on_release=clear_canvas)

        return parent

if __name__ == '__main__':
    MyPaintApp().run()
Please save this code inside a file with the name main.py. You will need to
make a directory which will hold your python application code. For example, you
can do the following:
mkdir ~/paint
mv main.py ~/paint
So now paint contains main.py file which holds your python code.
The example above is borrowed from
this tutorial
but we have added some pyobjus things to it. So we are now using a
NSArray to store information about the line color, and we are using a
NSString to set the text of the button.
Now you can create an xcode project which will hold our python application. kivy-ios comes with script for creating xcode projects for you. You only need to specify the project name and the absolute path to your app.
Execute the following command:
./toolchain.py create paintApp ~/paint/
Notice the following. The second parameter which we are passing to the script is the name of our app. In this case, the name of our iOS app will be paintApp. The third parameter is the absolute path to our python app which we want to run on iOS.
After executing this command you will get output similar to this:
-> Create /Users/myName/kivy-ios/paintApp-ios directory
-> Copy templates
-> Customize templates
-> Done !

Your project is available at /Users/myName/kivy-ios/paintapp-ios

You can now type: open /Users/myName/kivy-ios/paintapp-ios/paintapp.xcodeproj
Note that the name is converted to lower case. If you enter the paintapp-ios
directory you will see that there are main.m, bridge.m and other
resources.
You can open this project with xcode as follows:
open /Users/myName/kivy-ios/paintapp-ios/paintapp.xcodeproj
If you have setup your developer account, you only need to click play and the app will be deployed on your iOS device.
This is screenshot from my iPad.
Accessing the accelerometer#
To access the accelerometer on iOS devices, you use the CoreMotion framework. The CoreMotion framework is added by default in the project template which ships with kivy-ios.
Let’s say that we have a class interface with the following properties and variables:
@interface bridge : NSObject {
    NSOperationQueue *queue;
}

@property (strong, nonatomic) CMMotionManager *motionManager;
@property (nonatomic) double ac_x;
@property (nonatomic) double ac_y;
@property (nonatomic) double ac_z;
@end
Also, let’s say that we have an init method which inits the motionManager
and the queue, and we have a method for running the accelerometer, and
that method is declared as follows:
- (void)startAccelerometer {
    if ([self.motionManager isAccelerometerAvailable] == YES) {
        [self.motionManager startAccelerometerUpdatesToQueue:queue withHandler:^(CMAccelerometerData *accelerometerData, NSError *error) {
            self.ac_x = accelerometerData.acceleration.x;
            self.ac_y = accelerometerData.acceleration.y;
            self.ac_z = accelerometerData.acceleration.z;
        }];
    }
}
You can see here that we are specifying a handler which will be called when we get some updates from the accelerometer. Currently you can’t implement this handler from pyobjus, so that may be a problem.
But, we have solution for this. We have added a bridge class for this purpose:
to implement handlers in pure Objective C, and then call methods of the bridge
class so we can get the actual data in Python. In this example, we are storing
the x, y and z values from the accelerometer in the ac_x, ac_y
and ac_z class properties. We can then easily access these class
properties.
So let’s see a basic example how to read accelerometer data from pyobjus:
from pyobjus import autoclass

def run():
    Bridge = autoclass('bridge')
    br = Bridge.alloc().init()
    br.motionManager.setAccelerometerUpdateInterval_(0.1)
    br.startAccelerometer()

    for i in range(10000):
        print 'x: {0} y: {1} z: {2}'.format(br.ac_x, br.ac_y, br.ac_z)

if __name__ == "__main__":
    run()
So if you run this script on an iPad, in the way we have shown above, you’ll get output similar to this in the xcode console:
x: 0.0219268798828 y: 0.111801147461 z: -0.976440429688
x: 0.0219268798828 y: 0.111801147461 z: -0.976440429688
x: 0.0219268798828 y: 0.111801147461 z: -0.976440429688
x: 0.0219268798828 y: 0.111801147461 z: -0.964920043945
x: 0.145629882812 y: -0.00624084472656 z: -0.964920043945
x: 0.145629882812 y: -0.00624084472656 z: -0.964920043945
x: 0.145629882812 y: -0.00624084472656 z: -0.964920043945
x: 0.145629882812 y: -0.00624084472656 z: -0.964920043945
As you can see, we have data from the accelerometer, so you can use it for some practical purposes if you want.
Accessing the gyroscope#
In a similar way as we accessed the accelerometer, we can access the gyroscope. So let’s expand our bridge class interface with properties which will hold gyro data:
@property (nonatomic) double gy_x;
@property (nonatomic) double gy_y;
@property (nonatomic) double gy_z;
Then in the bridge class implementation, add the following method:
- (void)startGyroscope {
    if ([self.motionManager isGyroAvailable] == YES) {
        [self.motionManager startGyroUpdatesToQueue:queue withHandler:^(CMGyroData *gyroData, NSError *error) {
            self.gy_x = gyroData.rotationRate.x;
            self.gy_y = gyroData.rotationRate.y;
            self.gy_z = gyroData.rotationRate.z;
        }];
    }
}
This method is probably familiar to you because it is very similar to the method used for getting accelerometer data. Let’s write some python code to read this data from python:
from pyobjus import autoclass

def run():
    Bridge = autoclass('bridge')
    br = Bridge.alloc().init()
    br.startGyroscope()

    for i in range(10000):
        print 'x: {0} y: {1} z: {2}'.format(br.gy_x, br.gy_y, br.gy_z)

if __name__ == "__main__":
    run()
You will get output similar to this:
x: 0.019542276079 y: 0.0267431973505 z: 0.00300590992237
x: 0.019542276079 y: 0.0267431973505 z: 0.00300590992237
x: 0.019542276079 y: 0.0267431973505 z: 0.00300590992237
x: 0.019542276079 y: 0.0267431973505 z: 0.00300590992237
x: 0.019542276079 y: 0.0267431973505 z: 0.00300590992237
x: 0.019542276079 y: 0.018291389315 z: -0.00338913880323
x: 0.018301243011 y: 0.018291389315 z: -0.00338913880323
x: 0.018301243011 y: 0.018291389315 z: -0.00338913880323
x: 0.018301243011 y: 0.018291389315 z: -0.00338913880323
x: 0.018301243011 y: 0.018291389315 z: -0.00338913880323
x: 0.018301243011 y: 0.018291389315 z: -0.00338913880323
x: 0.0183009766949 y: 0.0170807162834 z: -0.00339499775763
x: 0.0183009766949 y: 0.0170807162834 z: -0.00339499775763
So now you can use gyro data in your Python kivy application.
Accessing the magnetometer#
You can probably guess that this will be almost identical to the previous two examples. Let’s add two new properties to the interface of the bridge class:
@property (nonatomic) double mg_x;
@property (nonatomic) double mg_y;
@property (nonatomic) double mg_z;
And then add the following method to the bridge class:
- (void)startMagnetometer {
    if (self.motionManager.magnetometerAvailable) {
        [self.motionManager startMagnetometerUpdatesToQueue:queue withHandler:^(CMMagnetometerData *magnetometerData, NSError *error) {
            self.mg_x = magnetometerData.magneticField.x;
            self.mg_y = magnetometerData.magneticField.y;
            self.mg_z = magnetometerData.magneticField.z;
        }];
    }
}
Now we can use the methods above from pyobjus to get the data from the magnetometer:
from pyobjus import autoclass

def run():
    Bridge = autoclass('bridge')
    br = Bridge.alloc().init()
    br.startMagnetometer()

    for i in range(10000):
        print 'x: {0} y: {1} z: {2}'.format(br.mg_x, br.mg_y, br.mg_z)

if __name__ == "__main__":
    run()
You will get output similar to this:
x: 29.109375 y: -46.694519043 z: -27.4476470947
x: 29.109375 y: -46.694519043 z: -27.4476470947
x: 29.109375 y: -47.7679595947 z: -24.6468658447
x: 28.03125 y: -47.7679595947 z: -24.6468658447
x: 28.03125 y: -47.7679595947 z: -24.6468658447
: 28.03125 y: -47.7679595947 z: -24.6468658447
x: 28.03125 y: -47.7679595947 z: -24.6468658447
x: 28.03125 y: -48.3046875 z: -27.4476470947
x: 27.4921875 y: -48.3046875 z: -27.4476470947
x: 27.4921875 y: -48.3046875 z: -27.4476470947
x: 27.4921875 y: -48.3046875 z: -27.4476470947
x: 27.4921875 y: -48.3046875 z: -27.4476470947
x: 27.4921875 y: -47.2312469482 z: -28.5679626
You can add additional bridge methods to your pyobjus iOS app by changing the content of the bridge.m/.h files, or by adding completely new files and classes to your xcode project. After that, you can consume them with pyobjus using the methods illustrated above.
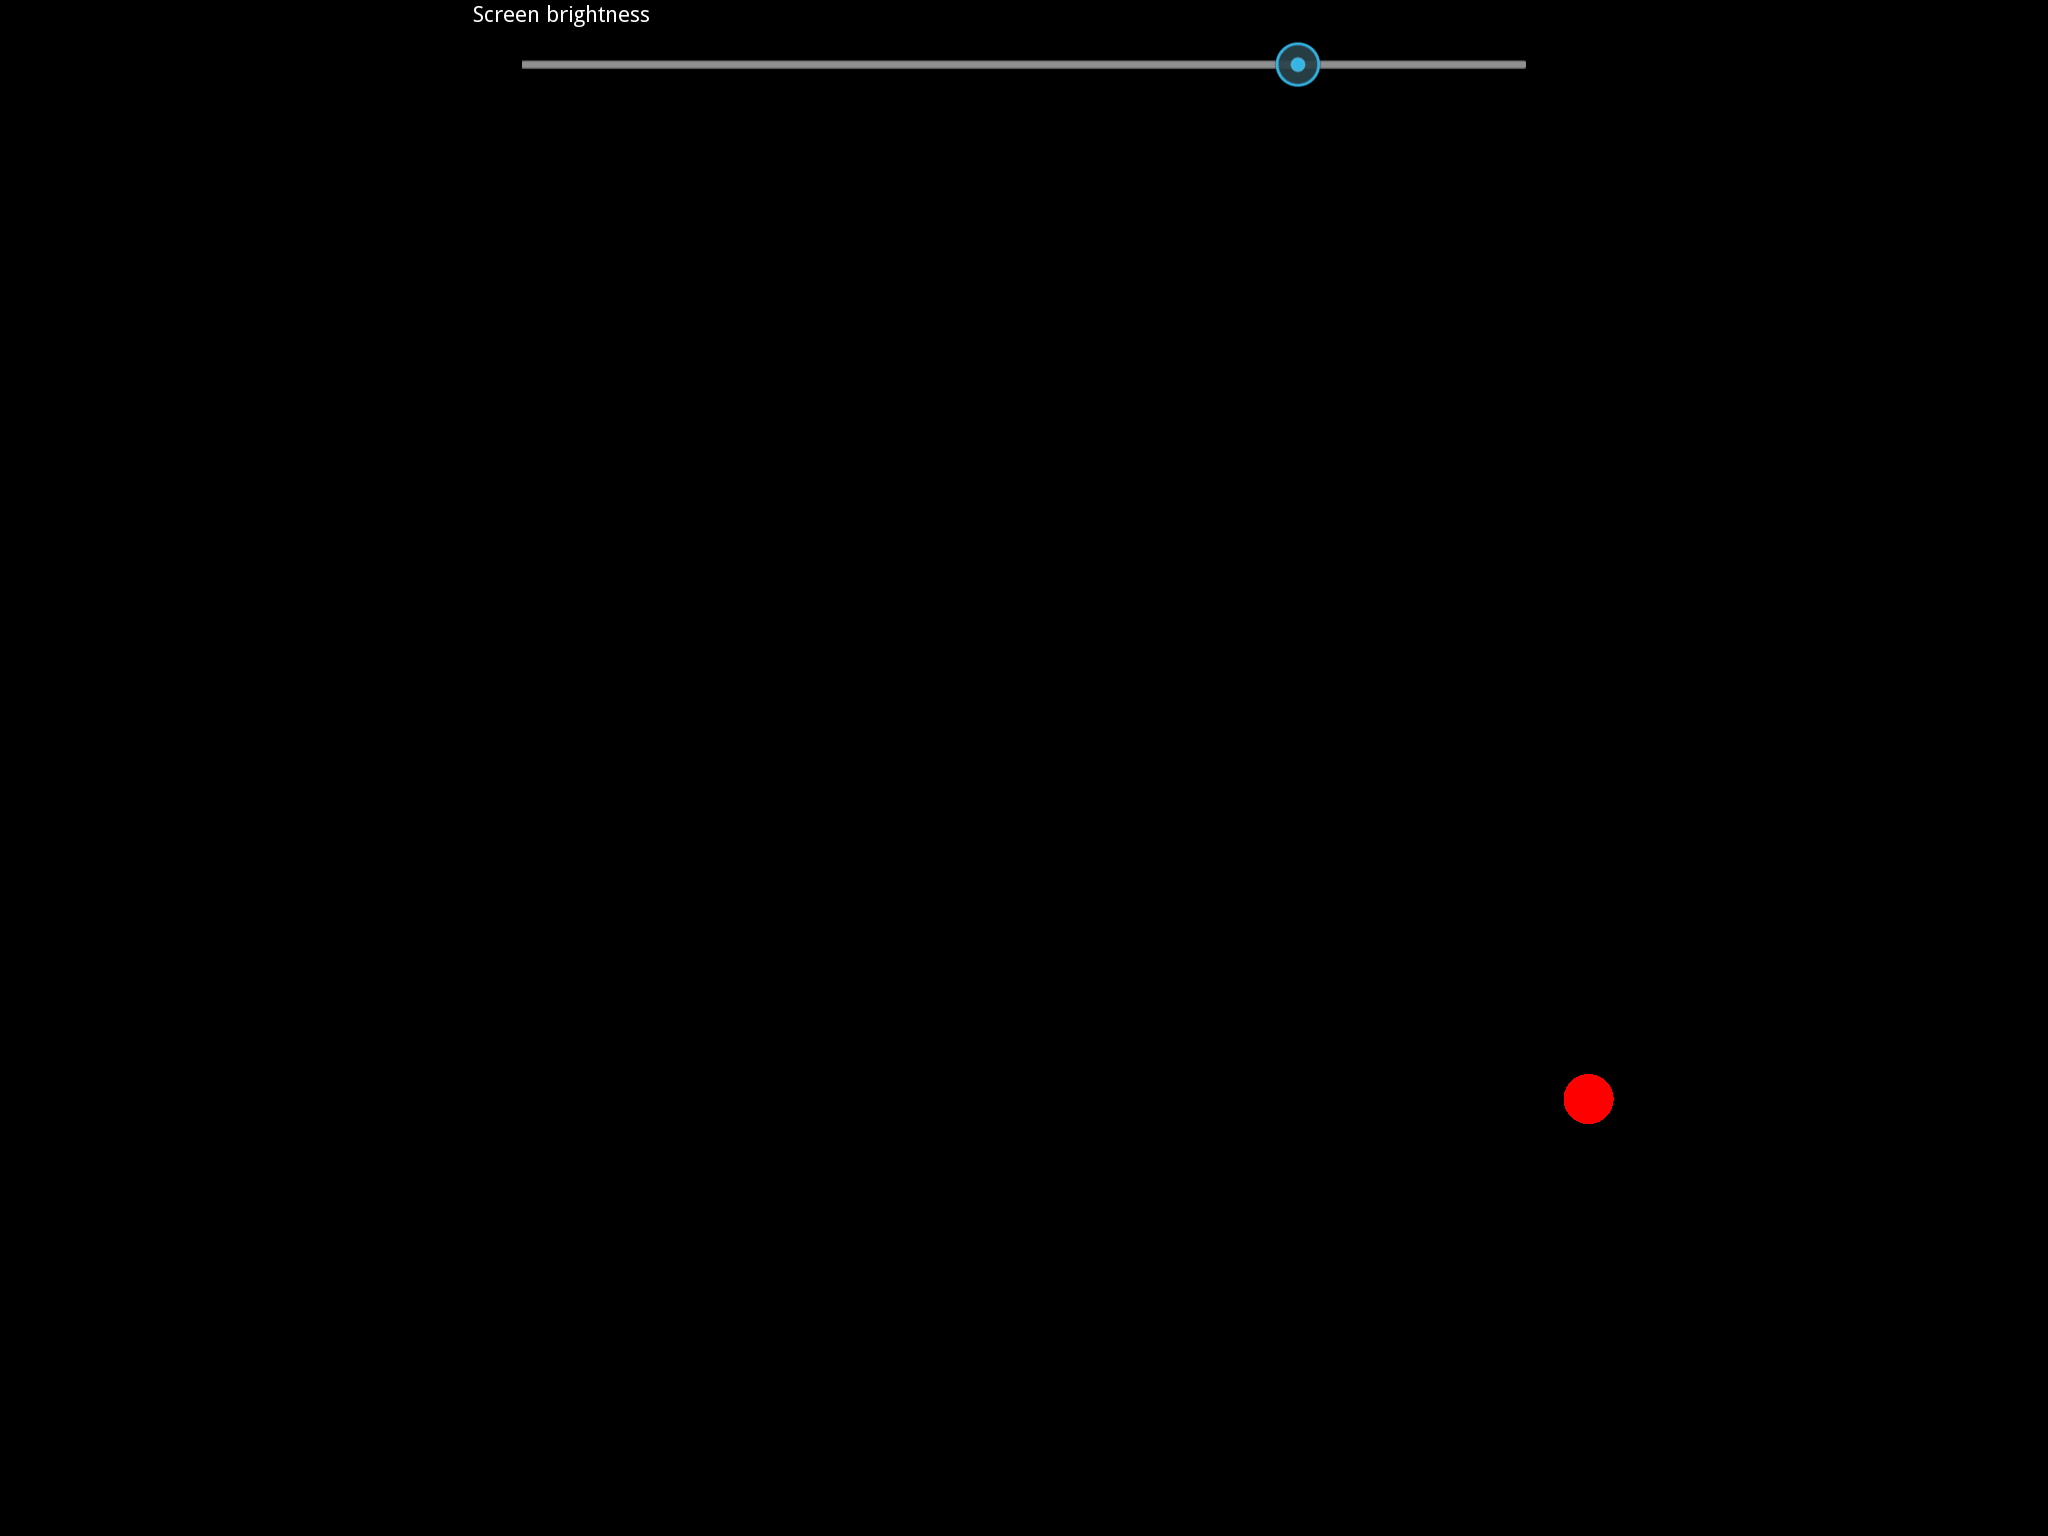
Pyobjus-ball example#
We’ve made a simple example using the accelerometer to control a ball on screen. In addition, with this example, you can set you screen brightness using a kivy slider.
We won’t go into the details of the kivy language or kivy itself as you can find excellent examples and docs on the official kivy site.
So, here is the code of the main.py file:
from random import random
from kivy.app import App
from kivy.uix.widget import Widget
from kivy.properties import NumericProperty, ReferenceListProperty, ObjectProperty
from kivy.vector import Vector
from kivy.clock import Clock
from kivy.graphics import Color
from pyobjus import autoclass

class Ball(Widget):

    velocity_x = NumericProperty(0)
    velocity_y = NumericProperty(0)
    h = NumericProperty(0)
    velocity = ReferenceListProperty(velocity_x, velocity_y)

    def move(self):
        self.pos = Vector(*self.velocity) + self.pos

class PyobjusGame(Widget):

    ball = ObjectProperty(None)
    screen = ObjectProperty(autoclass('UIScreen').mainScreen())
    bridge = ObjectProperty(autoclass('bridge').alloc().init())
    sensitivity = ObjectProperty(50)
    br_slider = ObjectProperty(None)

    def __init__(self, *args, **kwargs):
        super(PyobjusGame, self).__init__()
        self.bridge.startAccelerometer()

    def __dealloc__(self, *args, **kwargs):
        self.bridge.stopAccelerometer()
        super(PyobjusGame, self).__dealloc__()

    def reset_ball_pos(self):
        self.ball.pos = self.width / 2, self.height / 2

    def on_bright_slider_change(self):
        self.screen.brightness = self.br_slider.value

    def update(self, dt):
        self.ball.move()
        self.ball.velocity_x = self.bridge.ac_x * self.sensitivity
        self.ball.velocity_y = self.bridge.ac_y * self.sensitivity

        if (self.ball.y < 0) or (self.ball.top >= self.height):
            self.reset_ball_pos()
            self.ball.h = random()

        if (self.ball.x < 0) or (self.ball.right >= self.width):
            self.reset_ball_pos()
            self.ball.h = random()


class PyobjusBallApp(App):

    def build(self):
        game = PyobjusGame()
        Clock.schedule_interval(game.update, 1.0/60.0)
        return game


if __name__ == '__main__':
    PyobjusBallApp().run()
And the contents of pyobjusball.kv are:
<Ball>:
    size: 50, 50
    h: 0
    canvas:
        Color:
            hsv: self.h, 1, 1,
        Ellipse:
            pos: self.pos
            size: self.size

<PyobjusGame>:
    ball: pyobjus_ball
    br_slider: bright_slider

    Label:
        text: 'Screen brightness'
        pos: bright_slider.x, bright_slider.y + bright_slider.height / 2
    Slider:
        pos: self.parent.width / 4, self.parent.height / 1.1
        id: bright_slider
        value: 0.5
        max: 1
        min: 0
        width: self.parent.width / 2
        height: self.parent.height / 10
        on_touch_up: root.on_bright_slider_change()

    Ball:
        id: pyobjus_ball
        center: self.parent.center
Now create a directory with the name pyobjus-ball and place the files above
in it:
mkdir pyobjus-ball
mv main.py pyobjus-ball
mv pyobjusball.kv pyobjus-ball
In this step, we assume that you have already have downloaded and built
kivy-ios. Navigate to the directory where kivy-ios is located,
then execute the following commands:
tools/create-xcode-project.sh pyobjusBall /path/to/pyobjus-ball
open app-pyobjusball/pyobjusball.xcodeproj/
After this step, xcode will open and, if you have connected your iOS device to your computer, you can run the project and will see your app running on your device.
This is a screenshot from an iPad.